Accessing WebDAV Server Located on a Different Domain (Cross-Domain, Cross-Port and Cross-Protocol Requests)
How to avoid CORS
The simplest way to avoid CORS is to place the page with Ajax File Browser in the same domain with WebDAV server (webdavserver.com in the example below). You can reference all CSS, js files and images required for Ajax File Browser from any other domain (www.ajaxbrowser.com in the example below).
Here is how your page on webdavserver.com will look like, in this case:
<!DOCTYPE HTML PUBLIC '-//W3C//DTD HTML 4.01//EN' 'http://www.w3.org/TR/html4/strict.dtd'>
<html>
<head>
<title>IT Hit AJAX File Browser</title>


<style type='text/css'>
@import 'http://ajaxbrowser.com/ITHitService/AjaxFileBrowser/themes/clean/include.css';
@import 'http://ajaxbrowser.com/ITHitService/AjaxFileBrowser/browser/themes/clean/icons_32.css';
html, body {
    margin: 0px;
    padding: 0px;
    width: 100%;
    height: 100%;
}
</style>


<script src='http://ajaxbrowser.com/ITHitService/AjaxFileBrowser/ITHitAJAXFileBrowser.js' type='text/javascript'></script>


<script type='text/javascript'>
function InitAjaxFileBrowser() {
    var webDavServerPath = 'http://webdavserver.com/dav/';


    var settings = {
        Id: 'AjaxFileBrowserContainer',
        Url: webDavServerPath,

        Style: 'height: 100%; width: 100%',
        FileIconsPath: 'http://www.ajaxbrowser.com/ITHitService/AjaxFileBrowser/icons/',
        MsOfficeTemplatesPath: webDavServerPath + 'templates/',

        SelectedFolder: webDavServerPath,

        PluginsPath: 'http://www.ajaxbrowser.com/ITHitService/AjaxFileBrowser/plugins/'
    };


    var ajaxFileBrowser = new ITHit.WebDAV.Client.AjaxFileBrowser.Controller(settings);
}
</script>


</head>
<body onload='InitAjaxFileBrowser();'>
<div id='AjaxFileBrowserContainer' class='ih_style' style='width: 100%; height: 100%'></div>
</body>
</html>
If you still need to use CORS read instructions below.
Using CORS
The IT Hit AJAX File browser can upload and manage files on WebDAV servers located in other domains. If your WebDAV server is located on a different domain, on a different port or using different protocol (HTTP / HTTPS) such requests are considered to be cross-domain, cross-port or cross-protocol and are called cross-origin requests. By default, such requests are prohibited by the browser unless the server or the user allows them. To test cross-origin access, you can use the Cross-Origin Request Demo page.
Below we describe how to enable cross-origin requests in each of 4 major browsers.
In FireFox, Safari, Chrome and IE 10+
To enable cross-origin requests in FireFox, Safari, Chrome and IE 10 and later your server must attach the following headers to all responses:
Access-Control-Allow-Origin: http://webdavserver.com
Access-Control-Allow-Credentials: true
Access-Control-Allow-Methods: ACL, CANCELUPLOAD, CHECKIN, CHECKOUT, COPY, DELETE, GET, HEAD, LOCK, MKCALENDAR, MKCOL, MOVE, OPTIONS, POST, PROPFIND, PROPPATCH, PUT, REPORT, SEARCH, UNCHECKOUT, UNLOCK, UPDATE, VERSION-CONTROL
Access-Control-Allow-Headers: Overwrite, Destination, Content-Type, Depth, User-Agent, Translate, Range, Content-Range, Timeout, X-File-Size, X-Requested-With, If-Modified-Since, X-File-Name, Cache-Control, Location, Lock-Token, If
Access-Control-Expose-Headers: DAV, content-length, Allow
These headers will enable cross-domain requests in FireFox 3.6+, Safari 4+, Chrome 4+ and IE 10+. Older versions of this browsers do not allow cross-domain requests.
Important! Firefox and Chrome require exact domain specification in Access-Control-Allow-Origin header. For servers with authentication, these browsers do not allow "*" in this header. The Access-Control-Allow-Origin header must contain the value of the Origin header passed by the client.
Optionally you can also attach the Access-Control-Max-Age header specifying the amount of seconds that the preflight request will be cached, this will reduce the amount of requests:
Access-Control-Max-Age: 3600
Important! IT Hit WebDAV Server Engine for .Net and for Java adds necessary Access-Control headers automatically. You do not need to add them manually.
In Internet Explorer 9 and Earlier
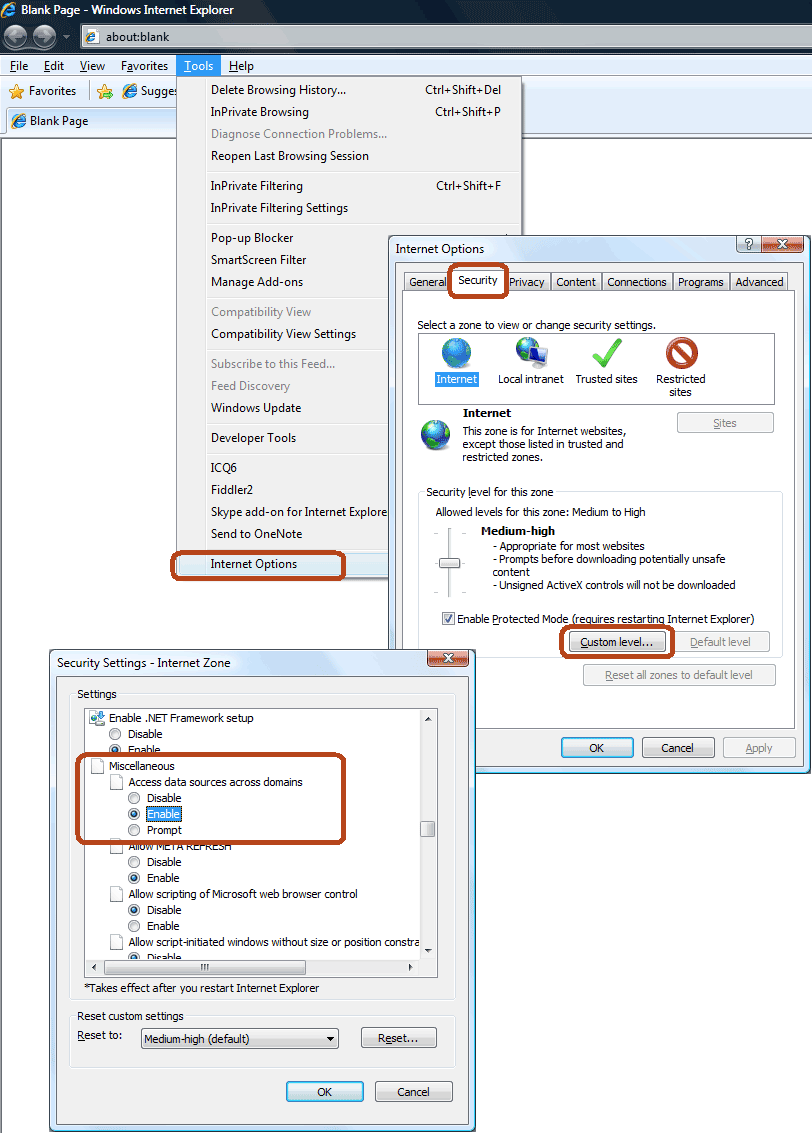
Internet Explorer 9 and earlier ignores Access-Control-Allow headers and by default prohibits cross-origin requests for Internet Zone. To enable cross-origin access go to Tools->Internet Options->Security tab, click on “Custom Level” button. Find the Miscellaneous -> Access data sources across domains setting and select “Enable” option.
If your server is located in Intranet Zane by default IE will pop the confirmation dialog during first cross-domain request: “This page is accessing information that is not under its control. This poses a security risk. Do you want to continue?”. To suppress this warning, you will need to set the "Access data sources across domains" setting to "Allow".
