Spring Boot WebDAV Server Example with Amazon S3 Back-end, Java
This sample is a fully functional Class 2 WebDAV server that runs on the Spring Boot framework and stores all data in the Amazon S3 bucket. The WebDAV requests are processed on a /DAV/ context, while the rest of the website processes regular HTTP requests, serving web pages. Documents are being published from the Amazon S3 bucket with locks and custom attributed being stored in S3 Metadata.
This sample can be downloaded in the product download area as well as it is published on GitHub.
This sample is using IT Hit WebDAV Ajax Library to display and browse server content on a default web page as well as to open documents for editing from a web page and save back directly to the server.
Requirements
- Java 1.8.
- Lombok plug-in should be installed in your favorite IDE otherwise syntax error will be displayed
Running the sample
-
Set the license. Download your license file here. To set the license, edit the webdav.license section in \springboot\src\main\resources\application.properties and specify the path to the license.lic file.
webdav.license=C:\License.lic
The IT Hit Java WebDAV Server Library is fully functional and does not have any limitations. However, the trial period is limited to 1 month. After the trial period expires the Java WebDAV Server will stop working. -
Configure the Amazon S3 storage. You can either use an existing Amazon S3 bucket or create a new one. To create a bucket you can use the Amazon S3 web console.

After creating the S3 bucket you can create some folders and upload files for testing purposes.
-
Configure the Amazon S3 project settings. In application.properties set the following properties:
# Amazon S3 region
webdav.s3.region=
# Amazon S3 access key
webdav.s3.access-key=
# Amazon S3 secret access key
webdav.s3.secret-access-key=
# Amazon S3 bucket name
webdav.s3.bucket=
-
Configure the application server. Here we will configure the WebDAV server to run on the website non-root context (https://server/DAV/). This setting is located in the webdav.rootContext section in the \springboot\src\main\resources\application.properties.
webdav.rootContext=/DAV/
Note: Some WebDAV clients (such as some old versions or Mini-redirector, Microsoft Web Folders, and MS Office 2007 and earlier) will fail to connect to a non-root server. They submit configuration requests to server root and if they do not get the response they will not be able to connect. For this reason, this sample processes OPTIONS and PROPFIND requests on all folders, including on the site root (https://server/). See also Making Microsoft Office to Work with WebDAV Server and Opening Microsoft Office Documents and Other Types of Files for Editing From a Web Page.
This Spring Boot sample supports those configuration requests and works properly on a non-root context. -
Running the springboot sample. To start the sample, change the directory to springboot and execute the following command:
mvnw spring-boot:run
If everything was set up properly you should see a sample web page on https://server/DAV/ URL with a list of sample files and folders previously created in S3. Now you can open documents for editing, manage documents, as well as connect to the server with any WebDAV client.
If anything goes wrong examine the log file. For Spring Boot, the log file is usually located at springboot/log/engine.log. You may also need to capture and examine the HTTP requests. See this article for more details.
The Project Classes
On the diagram below you can see the classes in the WebDAV SpringBoot S3 sample:
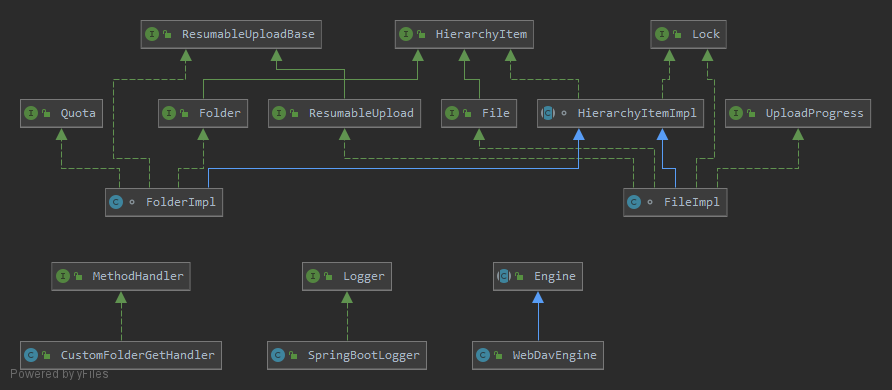
To adapt the sample to your needs, you will modify these classes to read and write data from and into your storage. You can find more about this in Creating a Class 1 WebDAV Server and Creating Class 2 WebDAV Server article as well as in the class reference documentation.
See Also:
- Running the WebDAV Samples
- WebDAV Server Samples Problems and Troubleshooting
- Creating a Class 1 WebDAV Server
- Creating a Class 2 WebDAV Server