WebDAV Server Example with Collection Synchronization Support
This sample is a fully functional Class 2 WebDAV server with collection synchronization support (RFC 6578) that stores all data in the file system. This sample is similar to what is provided by the Java demo WebDAV server at: https://webdavserver.com
To access this sample server and test synchronization you can use the WebDAV Drive sample for Windows and macOS.
This sample can be downloaded in the product download area as well as it is published on GitHub. It is available for both jakarta and javax.
Requirements
- Java 1.8.
- Apache Tomcat 7.0+ or GlassFish v4.1.1+ or WebLogic 12c+ or JBoss WildFly 9+ or WebSphere 16.0.0.2+.
- Windows OS
- NTFS
You will also need the IT Hit WebDAV Ajax Library to display JavaScript UI on a default web page. You can install it from NPM using NPM command line tool, see below. Node.js is ONLY required to download the JavaScript files used in the project. Node.js is NOT required to run the server.
Running the sample
- Set license. Download your license file here. To set the license, edit the 'license' section in \collectionsync\WEB-INF\web.xml and specify the path to the license.lic file.
<init-param>
      <param-name>license</param-name>
      <param-value>C:\License.lic</param-value>
</init-param>
The IT Hit Java WebDAV Server Library is fully functional and does not have any limitations. However, the trial period is limited to 1 month. After the trial period expires the Java WebDAV Server will stop working. - Download the IT Hit WebDAV Ajax Library. You can do this with NPM command-line tool, which is included with Node.js. Install the Node.js and navigate to \collectionsync\WEB-INF\wwwroot\js\ folder. Run:
npm install webdav.client
This will download IT Hit WebDAV Ajax Library files into your project. Note that Node.js itself is NOT required to run the server, it is used ONLY to install the required JavaScript files. - Configure the storage folder. By default, this sample publishes documents from the WEB-INF/Storage folder. For the sake of configuration simplicity, documents are extracted from project resources during the first run. You can publish documents from any other folder specifying a path in the 'root' section in web.xml:
<init-param> <param-name>root</param-name> <param-value>C:\Storage\</param-value> </init-param> - Configure the application server. Here we will configure WebDAV server to run on the website root (http://server.com/). Note: While you can configure WebDAV server to run on site non-root (for instance on http://server.com/webdavroot/) some WebDAV clients (such as some old versions or Mini-redirector, Microsoft Web Folders and MS Office 2007 and earlier) will fail to connect to non-root server. They submit configuration requests to server root and if they do not get the response they will not be able to connect. See also Making Microsoft Office to Work with WebDAV Server and Opening Microsoft Office Documents and Other Types of Files for Editing From a Web Page.
- In the case of Tomcat:
Copy \collectionsync folder to <Your Tomcat location>\Tomcat x.x\webapps folder. Add the following lines under the <Host> tag in <Your Tomcat location>\Tomcat x.x\conf\server.xml:
<Context path="" debug="0" docBase="collectionsync">
</Context>
To see if your server is running type the root URL of your WebDAV site in a browser and you will see the list of folders. Now connect to the server with any WebDAV client.
If you experience any problems examine the log created by tomcat: <Your Tomcat location>\Tomcat x.x\logs\localhost.xxxx-xx-xx.log.
- In the case of Glassfish:
- Deploy the collectionsync application.
From the main tree (Common Tasks) goto Applications.
Press Deploy and specify following properties:
- Local Packaged File or Directory That Is Accessible from the Enterprise Server = <path to collectionsync directory>
- Type = Web Application
- Context Root = /
Note: sample can be deployed to a non-root context, but some clients work only with servers deployed to root the context.
- Application Name = collectionsync
- Launch the sample.
From the main tree (Common Tasks) go to Applications.
Press Launch on collectionsync application.
If everything was set up properly you should see a sample page with a list of sample files and folders. Now connect to the server with any WebDAV client.
If anything goes wrong please consult log usually located at <GLASSFISH_INSTANCE_ROOT>/logs/server.log.
- Deploy the collectionsync application.
- In the case of JBoss WildFly:
- By default WildFly restricts access to certain packages from Java SDK. So you need to allow com.sun.nio.file package in the sun/jdk module by adding the following line in the module.xml file:
<path name="com/sun/nio/file"/>
Restart WildFly.
- Deploy the collectionsync application.
Create folder collectionsync.war under <WILDFLY_ROOT>/deployments.
Copy content of samples/collectionsync to <WILDFLY_ROOT>/deployments/collectionsync.war.
Create file collectionsync.war.dodeploy in <WILDFLY_ROOT>/deployments/collectionsync.war.
If everything was set up properly you should see a sample page on the WildFly root context with a list of sample files and folders. Now connect to the server with any WebDAV client.
If anything goes wrong please consult log usually located at <WILDFLY_ROOT>/log/server.log.
- By default WildFly restricts access to certain packages from Java SDK. So you need to allow com.sun.nio.file package in the sun/jdk module by adding the following line in the module.xml file:
- In the case of Tomcat:
The Project Classes
On the diagram below you can see the classes in the WebDAV Collectionsyncproject:
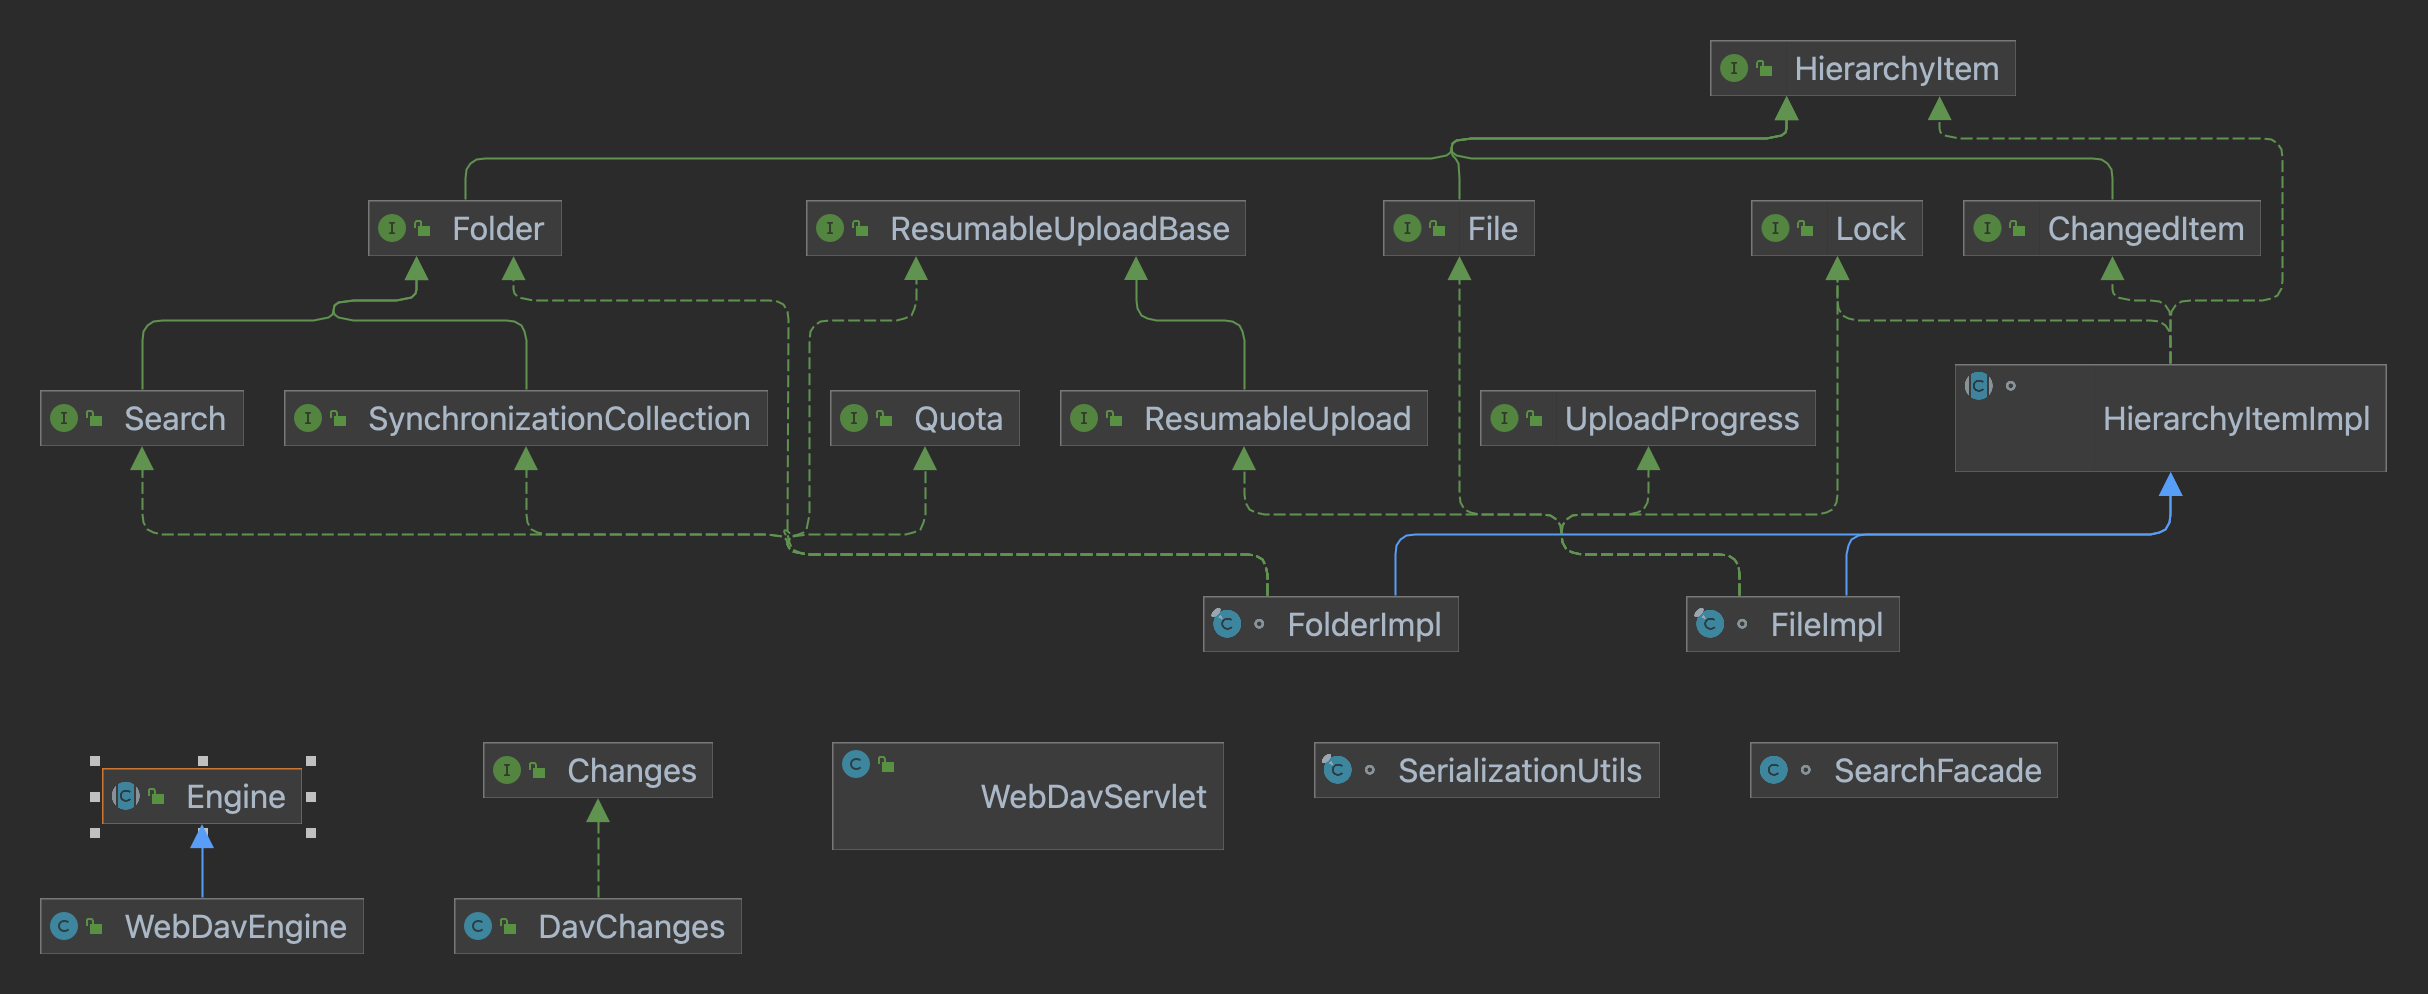
To adapt the sample to your needs, you will modify these classes to read and write data from and into your storage. You can find more about this in Creating a Class 1 WebDAV Server and Creating Class 2 WebDAV Server article as well as in the class reference documentation.
See Also:
- Running the WebDAV Samples
- WebDAV Server Samples Problems and Troubleshooting
- Creating a Class 1 WebDAV Server
- Creating a Class 2 WebDAV Server
collectionsync