Configuring WebDAV Server in IIS 7, 6, 5
Web application configuration is required if you plan to host your WebDAV Server in IIS. If you are creating HttpListener-based WebDAV server no IIS is required to be installed.
Creating WebDAV Server Web Application
Open your IIS MMC console and create a web application that will be the root of your WebDav Server storage. This web application must be mapped to the folder where your \bin folder with dlls and web.config file resides. To avoid Web Folders client bags on Windows 7, Windows Vista and Windows XP we recommend mapping you WebDAV server to the root of the website.
Web application must catch GET, HEAD, PUT, OPTIONS, PROPFIND, PROPPATCH, COPY, MOVE, DELETE, MKCOL, LOCK and UNLOCK verbs and forward them to your custom HttpHandler. For the sake of simplicity, we will create wildcard application map in IIS 7, 6, 5 and catch all verbs send to the server.
In Windows 7, Windows Vista and Windows Server 2008 (IIS 7)
Your WebDAV server application can utilize Integrated ASP.NET application pool or Classic application pool.
Integrated Application Pool
To run your web application in the Integrated application pool you must enable ASP.NET via ‘Control Panel->Programs and Features->Turn Windows features on or off’. You do not need to create aspnet_isapi.dll mapping or configure IIS 7 via MMC console. IIS 7 will use <system.webServer> tag from your web.config file to configure handler mappings:
<configuration>
      ...
      <system.webServer>
            <handlers>
                  <clear />
                  <add name="My WebDAV Handler" path="*" verb="*" type="WebDAVServer.SqlStorage.WebDAVHandler, WebDAVServer.SqlStorage" preCondition="integratedMode,runtimeVersionv2.0" />
            </handlers>
      ...
      </system.webServer>
</configuration>
Classic Application Pool if ASP.NET is Enabled
To run WebDAV server in Classic application pool at a minimum ISAPI Extensions must be enabled. Optionally you can enable ASP.NET, that will simplify your configuration efforts. If you have enabled ASP.NET the IIS will use <system.webServer> tag from your web.config file for wildcard mappings:
<configuration>
...
      <system.webServer>
            <handlers>
                  <clear />
                  <add name="aspnet_isapi 32-bit" path="*" verb="*" modules="IsapiModule" scriptProcessor="C:\Windows\Microsoft.NET\Framework\v2.0.50727\aspnet_isapi.dll" resourceType="Unspecified" requireAccess="Script" preCondition="classicMode,runtimeVersionv2.0,bitness32" />

                  <add name="aspnet_isapi 64-bit" path="*" verb="*" modules="IsapiModule" scriptProcessor="C:\Windows\Microsoft.NET\Framework64\v2.0.50727\aspnet_isapi.dll" resourceType="Unspecified" requireAccess="Script" preCondition="classicMode,runtimeVersionv2.0,bitness64" />
            </handlers>
...
      </system.webServer>
</configuration>
Note that web.config files provided with WebDAV server samples require ASP.NET to be enabled.
Classic Application Pool if ASP.NET is Disabled
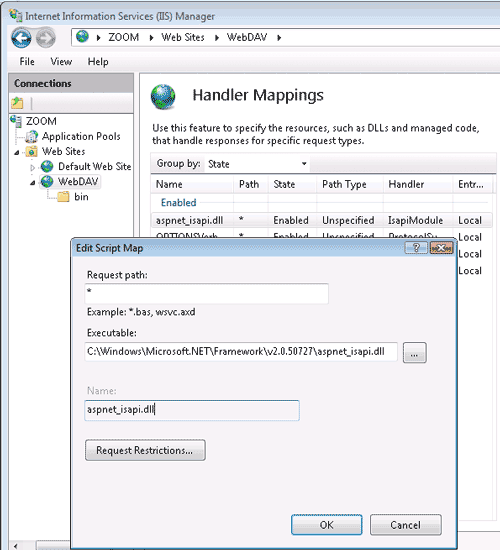
In case you would like to avoid enabling ASP.NET you can configure Handler Mappings via MMC console. In this case, open IIS MMC console and click on your web application. Then go to Handler Mappings. Click Add Script Map. Fill in the Edit Script Map form:
Request Path - *
Executable - <Windows Install Folder>\Microsoft.NET\Framework\<.Net Framework Version>\aspnet_isapi.dll
Request Restrictions -> Mapping Tab -> Invoke handler only if the request is mapped to – Unchecked
Request Restrictions -> Verbs Tab – All Verbs

In Windows Server 2003 (IIS 6)
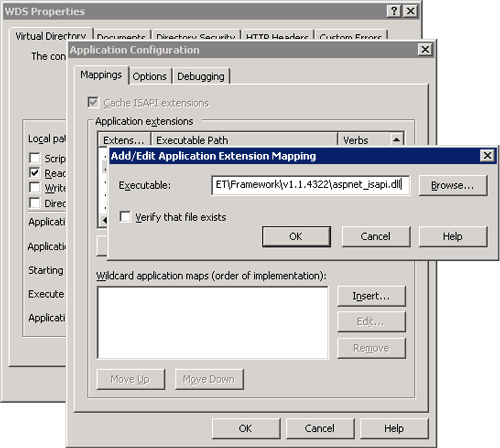
To create application map right click on your web application in IIS 6 MMC console and go to Properties->Virtual Directory Tab->Configuration. Click Insert to add new wildcard map.
Executable - <Windows Install Folder>\Microsoft.NET\Framework\<.Net Framework Version>\aspnet_isapi.dll
Verify that file exists - Unchecked

On Home Directory tab of your application properties set Execute permissions to Scripts only and allow reads.
In Windows XP and Windows 2000 Server (IIS 5 and earlier versions)
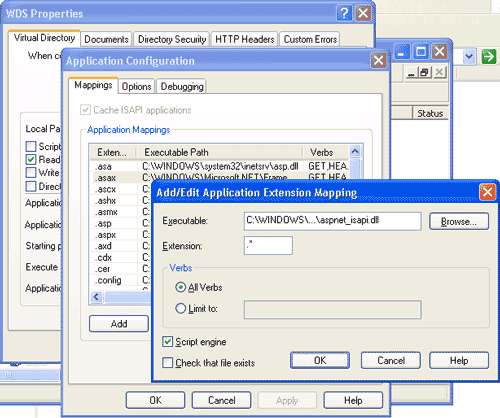
To create application map right click on your web application in IIS 5 MMC console and go to Properties->Virtual Directory Tab->Configuration. Click Add to add new application extension mapping.
Executable - <Windows Install Folder>\Microsoft.NET\Framework\<.Net Framework Version>\aspnet_isapi.dll
Extension - .*
Verbs – All verbs
Verify that file exists – Unchecked

On Home Directory tab of your application properties set Execute permissions to Scripts only and allow reads.