Adding WebDAV Support to Your Existing Web Project
If you wish to host ASP.NET web pages in one project with WebDAV server you will use the 'Add WebDAV Server Implementation' wizard, that is available in project context menu. Most of the options and steps of this wizard are similar to ' ASP.NET WebDAV Server Application' wizard, but the first and authentication steps are different. The code generated by 'Add WebDAV Server Implementation' wizard has following major differences from the one generated by 'ASP.NET WebDAV Server Application' Wizard:
-
It enables WebDAV on a separate folder while the rest of you website continues running ASP.NET pages.
-
It adds entries in web.config to support WebDAV requests on the site root.
-
It implements mixed authentication.
To see in details how it works let's create ASP.NET Web Application. For the sake of simplicity, to minimize the amount of configuration required for this demo, we recommend Microsoft SQL Express to be installed before running the wizard.
Select File->New Project in Visual Studio. In the 'New Project' dialog select Visual C# -> Web -> ASP.NET Web Application and make sure you specify .Net Framework 3.5 or later in .Net Framework version dropdown box.
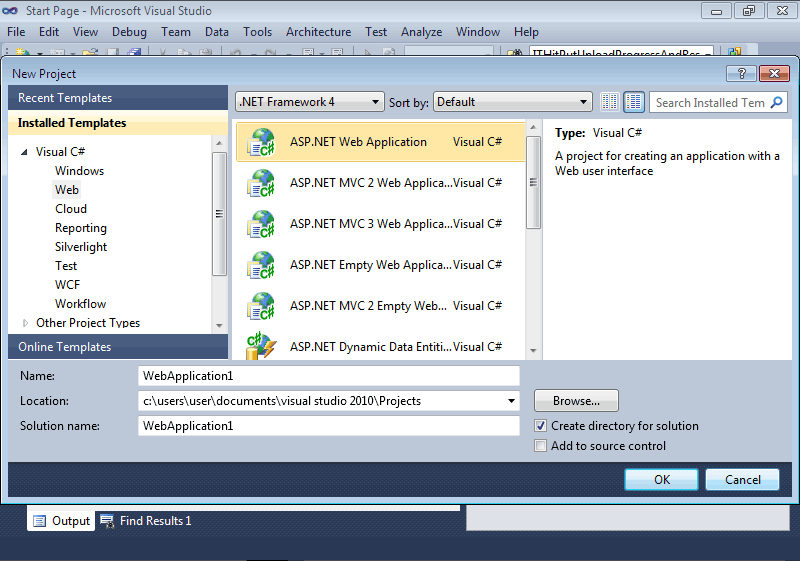
Finally, click 'OK'. You can also add WebDAV to other project types, for the list of supported project types please refer to this page.
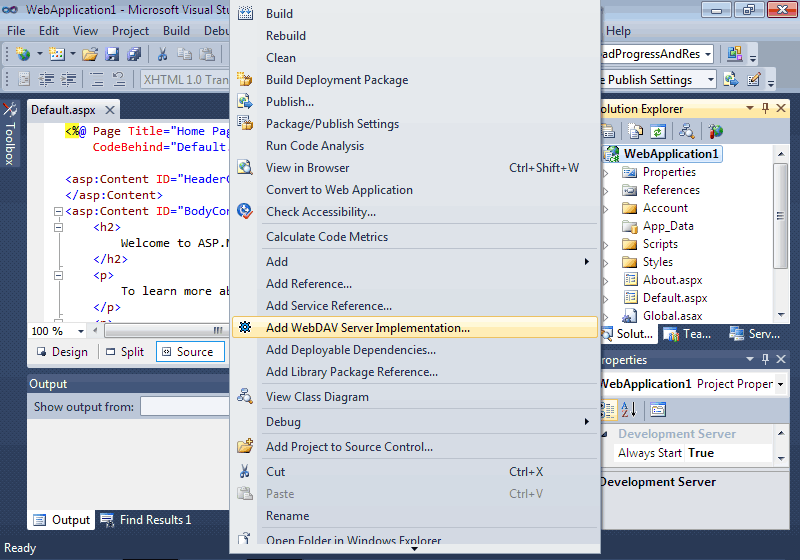
When the project is generated, start the WebDAV Server Wizard. Open Solution Explorer and right-click on your project node. Select 'Add WebDAV Server Implementation...'.
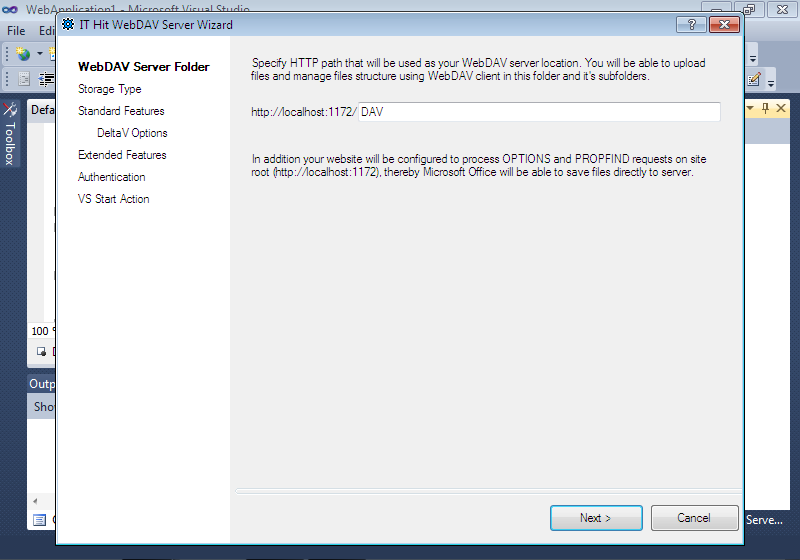
On the first step, you will specify the URL of the folder where WebDAV will be enabled.
The ASP.NET Web Application project is created by Visual Studio on the site root by default (http://server:1234/). But in case of Web Site project in file system, it is created as non-root (http://server:1234/WebSite1/). For non-root project, regardless of the type, the wizard will warn you about this, offering to remap the project to site root:
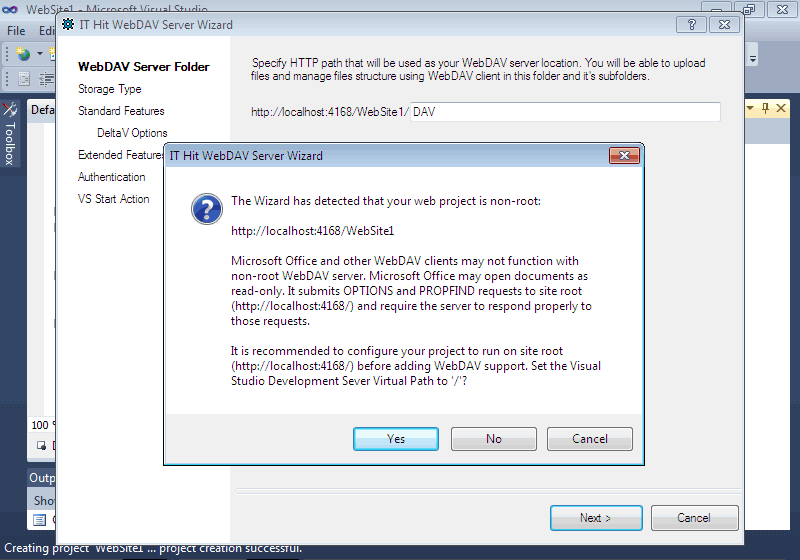
In the case your project is using VS Development Server, remapping to site the root can be done automatically by the wizard. If you click 'Yes' the wizard will modify your project settings immediately, for example in the case of Web Site project it will update the Virtual Path property setting of your project. If later you wish to undo this you will have to change the project settings manually.
In case your project is hosted in IIS there is no way to automatically remap the project to site root, you will have to cancel the wizard, remap site root manually in IIS and in project settings and then start the wizard again.
On this step, you can specify not just a single folder name but entire URL, for example 'My Folder/dav/docs/'. In this demo, we will leave the default 'DAV' value here. The path that you specify here will be created in your storage and will be specified in <location> tag in web.config:
This code is part of WebDAV Server File System sample provided with IT Hit WebDAV Server Engine for .NET
If later you decide to change the name of WebDAV folder you will have to change both values of the path attribute in <location> element and change it in your storage.
The <location> element contains configuration for your WebDAV folder. The major element that you can find here is your WebDAV handler, that processes all WebDAV requests, it is implemented in WebApplication1.WebDAVServerImpl.DavHandler class. As you can see, it is specified twice, in <httpHandlers> element, that is used in IIS Classic mode and in <system.webServer> element that is used in IIS Integrated mode. As soon as all requests to /DAV/ folder are processed by DavHandler class, all other handlers are not necessary and are removed by <clear> element.
The <security> element removes all limitations in /DAV/ folder. As soon as all files are created in your storage you can allow folders with 'App_Data', 'bin', etc names as well as files named web.config, etc. Note that in all other folders of your website, as well as on the root the security settings are not modified.
The <location> element can't contain modules, they are allowed only at the application level. That is why you will find the ITHitPutUploadProgressAndResumeModule and ITHitPostUploadProgressModule specified for entire website, rather for /DAV/ folder only.
Microsoft Office and Microsoft Miniredirector / Web Folders Support
The 'Add WebDAV Server Implementation Wizard...' not only enables WebDAV on a folder or your choice but also enables OPTIONS and PROPFIND requests on your site root. This two types of requests are very important for Microsoft Office and Microsoft Miniredirector. When connecting to the server these two WebDAV clients submit OPTIONS and PROPFIND requests to site the root as well as to each folder in the path to detect supported server options. For example, if your document is located at \DAV\Folder\mydoc.docx Microsoft Office may submit OPTIONS and PROPFIND requests to the site root (\), \DAV\ and \DAV\Folder\ folders.
These extra requests are one of the reasons to keep your file hierarchy shallow. The deeper the hierarchy the more requests are sent by Microsoft Office.
To process OPTIONS and PROPFIND requests on the site root the wizard have added the following two entries into your web.config for Classic and Integrated mode:
This code is part of WebDAV Server File System sample provided with IT Hit WebDAV Server Engine for .NET
The requests are forwarded to your handler implementation in DavHandler class and you must process them in the manner you process all other WebDAV requests. You can find more about how Microsoft Office opens files from server here and about the Microsoft Office read-only issue here.
In addition, to make proper authentication configuration OPTIONS request is always left unauthenticated (including the site root). This is not an error or bug. If the OPTIONS will request authentication, connections from some WebDAV clients, will fail.
While OPTIONS must be left unauthenticated, PROPFIND request requires authentication (including the site root) unless your WebDAV folder allows anonymous access. If you occasionally remove authentication from the site root, while all other PROPFIND requests will require authentication, Microsoft Office will not be able to open documents from the server or will open them as read-only. Here is what the wizard adds to your web.config for site root requests when Digest or Basic is selected on Authentication step, as you can see, unauthorized PROPFIND requests are denied:
This code is part of WebDAV Server File System sample provided with IT Hit WebDAV Server Engine for .NET
All next steps in the wizard, except Authentication step, are identical to ASP.NET WebDAV Application wizard, you can leave all options in a default state. We will skip there description and move directly to Authentication step and describe mixed authentication implementation.
Mixed Authentication
Most desktop WebDAV clients, shipped with OSs require standard-compliant authentication such as Basic, Digest or IWA. Neither Microsoft miniredirector nor Mac OS X Finder nor most versions of Microsoft Office support Forms/cookies authentication, they just unable to present HTML web page with your login form. They can only show a popup login dialog that you can't customize. Below you can see examples of Forms/cookies authentication HTML form and Digest authentication dialog in Chrome browser:
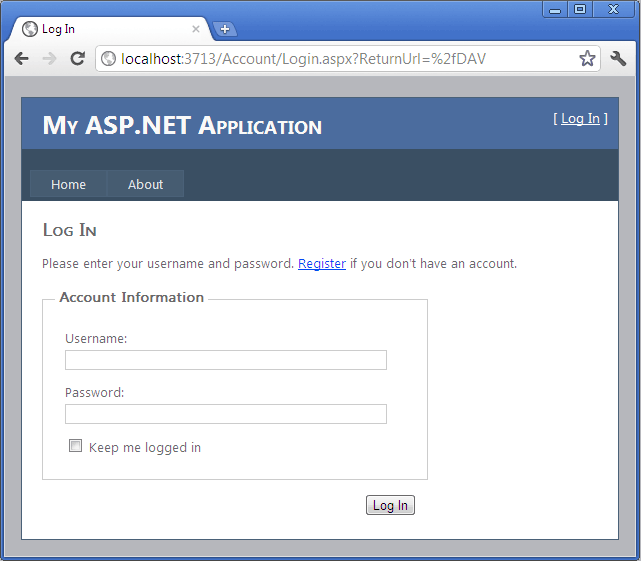
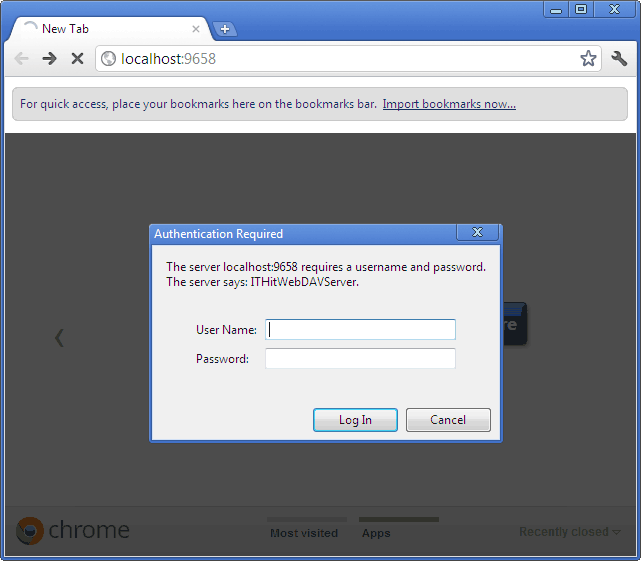
On the other hand, when creating a web page that contains hyperlink to a document located on a WebDAV server you do not want the pop-up browser login dialogs, such as shown in the right image. Instead, for consistent user experience, Forms/cookies authentication should be used seamlessly. If user already authenticated, his existing authentication token should be used and he should not be redirected to the login page.
To make you WebDAV server to support both Basic/Digest/IWA and Forms/cookies authentication, the Add WebDAV Server Implementation Wizard generates code that implements mixed authentication. Mixed authentication means your WebDAV server will use Basic/Digest/IWA authentication with desktop WebDAV clients and will use Forms/cookies with a web browser-based clients. You can find more about mixed authentication here.
To demonstrate how mixed authentication works let's move to Authentication step and Select 'Digest' authentication option. While all options on this step are similar to ASP.NET WebDAV Server Application wizard, the generated code contains significant differences.
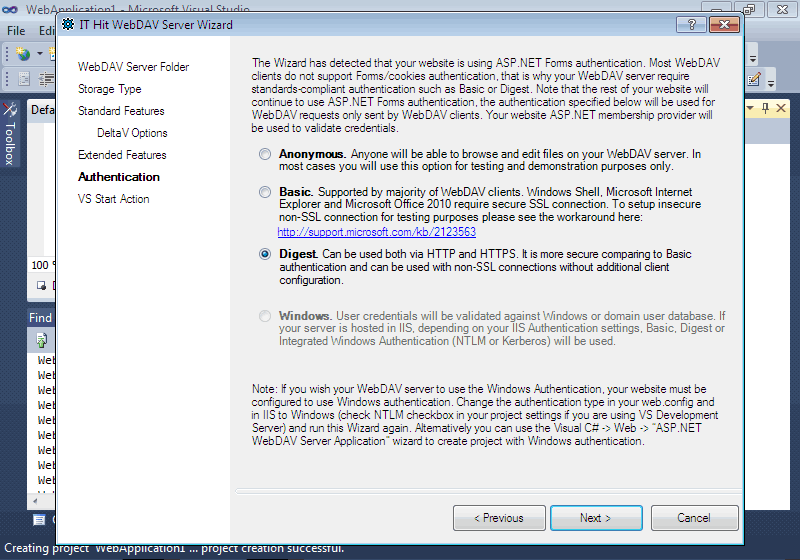
Similarly to ASP.NET WebDAV Server Application wizard, the generated code will utilize the ASP.NET membership provider to validate credentials. However in this case the wizard does not create the membership provider code. Instead it expects that some provider already exists in the project. the ASP.NET Web Application was created with SqlMembershipProvider by default:
This code is part of WebDAV Server File System sample provided with IT Hit WebDAV Server Engine for .NET
If no membership provider is found in web.config, the Basic and Digest authentication options will be disabled on Authentication step.
As soon as Digest authentication requires password to be retrievable from your storage, the wizard will analyze your membership provider options in web.config and if it detects that password is not retrievable it will offer to set appropriate options:
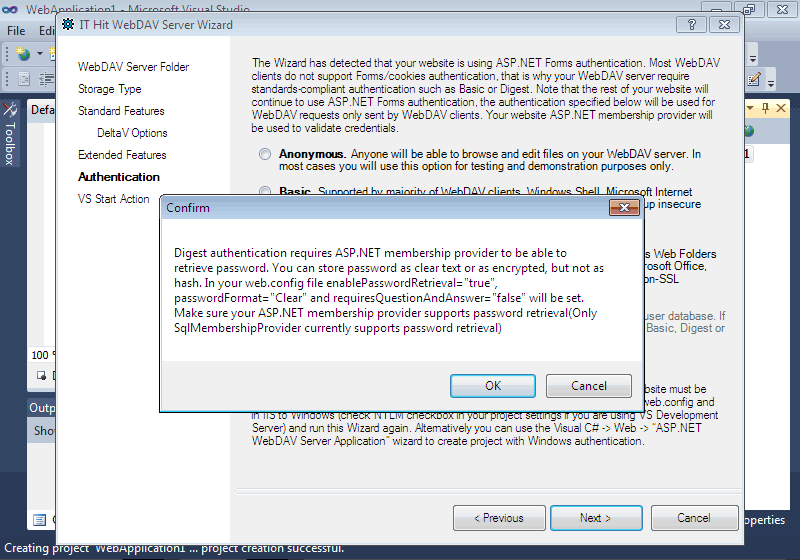
Confirm the clear text password message. Select 'Open WebDAV Server folder in default web browser' option on the next step and finish the wizard. Finally switch your project to IIS Express selecting 'Use IIS Express...' in project context menu'.
Now run the project. The Visual studio will run default web browser that will open the following url: http://localhost:1234/DAV/. However as soon as your server is protected with authentication you will be redirected to the login page: http://localhost:1234/Account/Login.aspx?ReturnUrl=%2fDAV. While you have selected 'Digest' authentication on 'Authentication' step you can see that the Forms/cookies authentication is used instead:
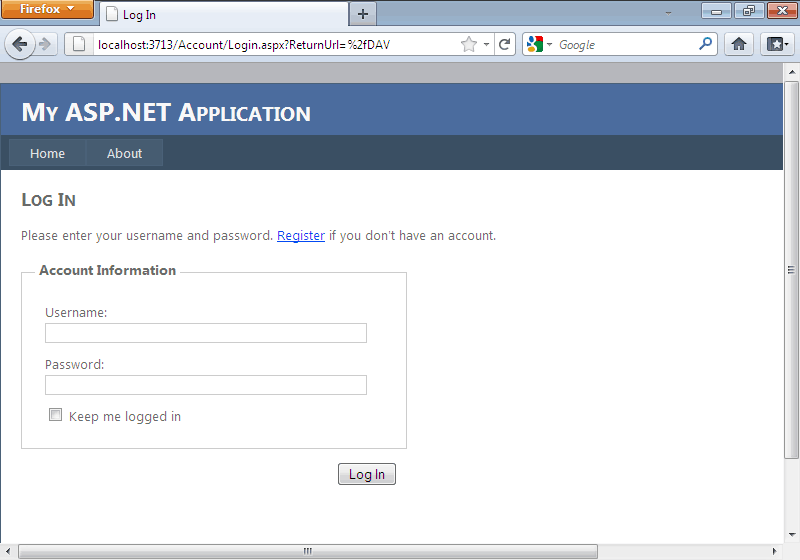
Now run the Windows Explorer (or any other desktop WebDAV client) and try to connect to your WebDAV server. Specify http://localhost:1234/DAV/ as WebDAV server path. You will see that Windows Explorer client (Web Folders / miniredirector) presents popup login dialog rquesting Digest authentication.
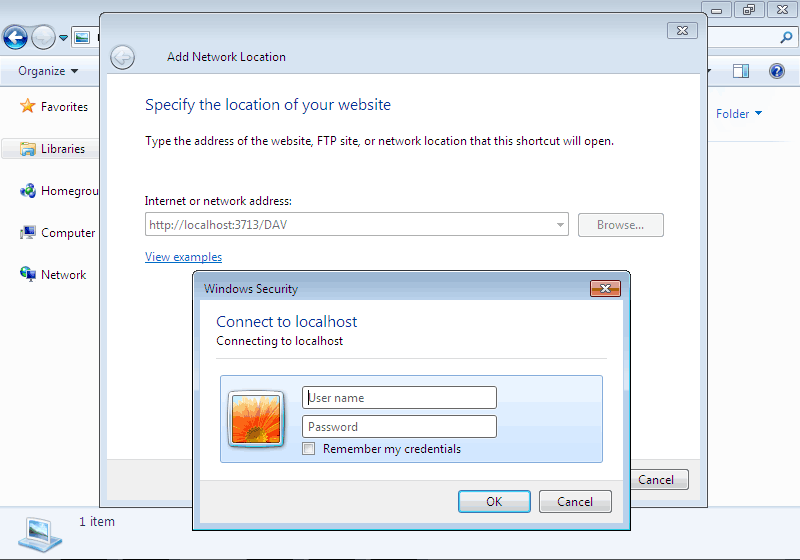
Now let's examine the authentication requests using Fiddler tool, or any other debugging proxy. Note that to capture requests using Fiddler on 'localhost' you must use 'localhost.fiddler' instead of 'localhost' when connecting to server, for example: http://localhost.fiddler:1234. Here is what you will see in Fiddler when request is sent by web browser, we were using Internet Explorer in this case:
This code is part of WebDAV Server File System sample provided with IT Hit WebDAV Server Engine for .NET
In case of Microsoft Web Folders / miniredirector WebDAV client you will see the following request and response:
This code is part of WebDAV Server File System sample provided with IT Hit WebDAV Server Engine for .NET
The major difference between these two requests is the User-Agent header. If the request is sent by a web browser, the User-Agent header starts with 'Mozilla'. The code generated by the Wizard analyzes this header to detect if Forms\cookies or Digest\Basic should be used:
This code is part of WebDAV Server File System sample provided with IT Hit WebDAV Server Engine for .NET
This code is part of WebDAV Server File System sample provided with IT Hit WebDAV Server Engine for .NET
Depending on the User-Agent header AuthenticationModuleBase class generates different response codes to trigger Forms\cookies or Digest\Basic authentication.
As we have said above, the Digest and Basic implementation generated by Wizard utilizes ASP.NET membership provider to validate credentials. If this is the 'clean' project there are no any logins in the membership provider database exist, so what you need to do, is to create at least one account in membership provider database. Click 'Register' and fill-in the information required to create new login. As soon as the login is created you can return to http://localhost:1234/DAV/ and login, or you can use these credentials in your desktop WebDAV client.
The Wizard has added Digest authentication module to your Web.config file in two places. <httpModules> section is used if your server is running in Classic mode, while <system.webServer> section is used in integrated mode:
This code is part of WebDAV Server File System sample provided with IT Hit WebDAV Server Engine for .NET
Modifications Made in Your Project by the Wizard
Let's see what changes the wizard have made in your project. The wizard have created the WebDAVServerImpl folder in which it added WebDAV Server Engine interfaces implementations, added \App_Data\WebDAV\Storage\DAV\ folder that keeps files published via WebDAV (the Wizard have populated it with sample files) and created \App_Data\WebDAV\Logs\ folder where log files will be created when you run the server. It also added a reference to ITHit.WebDAV.Server.dll to your project.
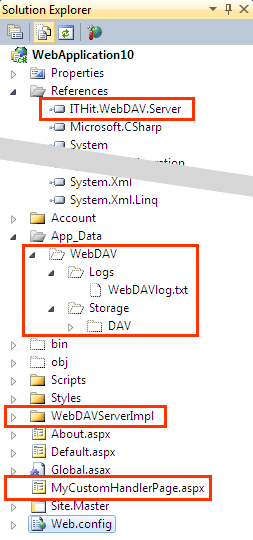
Changing the Name of Your Root WebDAV folder
By default the wizard offers the root WebDAV folder to be named /DAV/, you can change this name on the first step of the wizard. If after finishing wizard you decide to change the name of your root WebDAV folder you must make changes in the following places:
-
Rename folder located under \App_Data\WebDAV\Storage\.
-
Update path attribute in <location> element in web.config.
-
In case of MVC project update the <davLocations> element in web.config.
-
If you have selected 'Open WebDAV Server folder in default web browser' on 'VS Start Action' tab, in case of ASP.NET Web Application or MVC project, you must update the 'Specific Page' option located on Project properties Web tab. In case of Web Site project you must update the 'Specific Page' option located on Start Options tab of project Property Pages.